
Are you looking for ways to reduce energy costs?
Energy is an important expense in most industrial sites, and inefficient lighting systems are the main culprit. Lighting consumes up to 70% or more of energy in some applications. It is easy to see here that the overall operating costs have a significant impact.
- Upgrade luminaires
- Install lighting controls.
LED High Bay and Low Bay fixtures – The current mainstream practice is to replace existing metal halides and high pressure sodium lamps with LED high bay and low bay lights, with significant energy savings. When high occupancy sensors are applied to the lighting system, an additional 50-75% reduction in energy consumption can be achieved. However, many people overlooked it. This efficient lighting and occupancy control method significantly reduces energy and maintenance costs.
Why Use an Occupancy Sensor?
The occupancy rate in warehouses, distribution centers, production facilities, etc. is 50%, and sensors are ideal candidates. When space is not used, a large number of energy sources are consumed using standard high-bay fluorescent lamps or HID lamps. Because most facilities do not have the ability to control their lighting, these fixtures will continue to ignite and waste energy and money even if space is not occupied. Light is provided where it is needed, and occupancy of sensors can save energy and money.
For example, a “pick order” is issued at a large warehouse, and the picker identifies the aisle and drives a forklift truck into the space to pick the right order. If no sensor is used, the entire area lights up before and after the picker enters the space – even if no one else enters the area. This wastes energy and leads to higher costs. Now using the High Bay occupancy sensor, the sensor will sense movement close to the forklift. The lamp can only be turned on where there is movement or occupancy – significantly reducing energy consumption and costs. The sensor coverage is wide enough to identify the movement and turn on the light before the forklift enters the space. In addition, with a programmable timer, the light will turn off again after a period of inactivity.
This is just an example of how occupancy sensors cut costs and reduce energy.
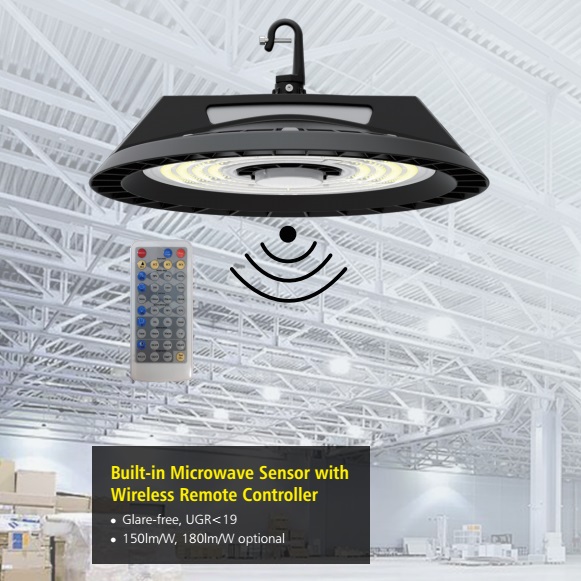
Occupancy sensor LED high bay light
TUBU’S built-in occupancy sensor LED high bay lights with remote control can maximize the energy saving, compared to the traditional control system to eliminate the wiring troubles, and save labor costs.
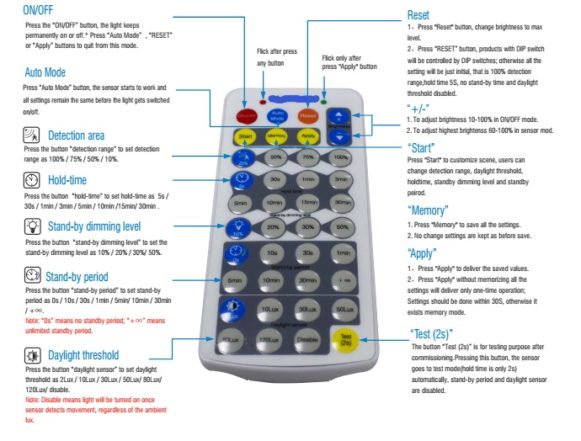
ON/OFF
Press the “ON/OFF” button, the light keeps permanently on or off.* Press “Auto Mode” , “RESET” or “Apply” buttons to quit from this mode.
Auto Mode
Press “Auto Mode” button, the sensor starts to work and all settings remain the same before the light gets switched on/off.
Detection area
Press the button “detection range” to set detection range as 100% / 75% / 50% / 10%.
Hold-time
Press the button “hold-time” to set hold-time as 5s / 30s / 1min / 3min / 5min / 10min /15min/ 30min .
Stand-by dimming level
Press the button “stand-by dimming level” to set the stand-by dimming level as 10% / 20% / 30%/ 50%.
Stand-by period
Press the button “stand-by period” to set stand-by period as 0s / 10s / 30s / 1min / 5min/ 10min / 30min
/ +∞.
Note: “0s” means no standby period; “+∞” means unlimited standby period.
Daylight threshold
Press the button “daylight sensor” to set daylight threshold as 2Lux / 10Lux / 30Lux / 50Lux/ 80Lux/ 120Lux/ disable.
Note: Disable means light will be turned on once sensor detects movement, regardless of the ambient lux.
Reset
1、Press “Reset” button, change brightness to max level.
2、Press “RESET” button, products with DIP switch will be controlled by DIP switches; otherwise all the setting will be just initial, that is 100% detection
range,hold time 5S, no stand-by time and daylight threshold disabled.
+/-
1.To adjust brightness 10-100% in ON/OFF mode.
2.To adjust highest brightenss 60-100% in sensor mod.
Start
Press “Start” to customize scene, users can change detection range, daylight threshold, holdtime, standby dimming level and standby peirod.
Memory
1.Press “Memory” to save all the settings.
2.No change settings are kept as before save.
Apply
- Press “Apply” to deliver the saved values.
- Press “Apply” without memorizing all the settings will deliver only one-time operation; Settings should be done within 30S, otherwise it
exists memory mode.
Daylight threshold
Press the button “daylight sensor” to set daylight threshold as 2Lux / 10Lux / 30Lux / 50Lux/ 80Lux/ 120Lux/ disable.
Note: Disable means light will be turned on once sensor detects movement, regardless of the ambient lux.
Test (2s)
The button “Test (2s)” is for testing purpose after commissioning.Pressing this button, the sensor goes to test mode(hold time is only 2s) automatically, stand-by period and daylight sensor are disabled.
Attention
- When using ON/OFF button, the rest setting buttons don’t work.
- Press “Auto Mode”or “Reset” buttons before setting functions Detection Range,Hold time, Daylight sensor, Standby period and Standby dimming level.
- Press Start and Memory button to change and save settings in any mode.
- When using the remote control, light flickers to show instruction received. 5.Every change will be automatically saved.